The No‑Code Way to Route Customer Receipts in Stripe: Beginner’s Guide to Selective Delivery
The No‑Code Way to Route Customer Receipts in Stripe: Beginner’s Guide to Selective Delivery
A single misrouted receipt can trigger hours of reconciliation and extra support tickets for finance teams. This beginner's guide shows a no-code way to route customer receipts in stripe using a dashboard-native app so you can send receipts only to customers who need them. If you feel overwhelmed, we start from zero and walk through setup, allowlist rules, and the audit log as part of No-Code Receipt Management so you can follow every step. On our website, RouteReceipts integrates directly into the Stripe dashboard and handles allowlists, decision audit logs, and the operational headaches of webhooks: credential management, token refresh, rate limits, retry logic, and monitoring. You might be surprised how quickly a dashboard-native allowlist replaces fragile webhook scripts.
Fundamentals and key concepts
Before you change receipt behavior in Stripe, you must understand which Stripe events produce emails, what an allowlist model means for billing communications, and the common business rules that justify selective delivery. These fundamentals let you map routing rules to real payment events and avoid rebuilding core pieces of billing infrastructure. Below are the specific concepts to keep in mind before implementing any no code stripe receipt routing.
How Stripe sends receipts by default 🧾
Stripe sends email receipts automatically for successful charges and invoice payments when the account-level receipt setting is enabled. That global switch applies to every customer on the account; Stripe does not expose a per-customer toggle for email receipts. Common events you will map rules to are charge.succeeded and invoice.payment_succeeded; refund receipt behavior depends on whether refund emails are enabled in your settings.
If you try a DIY approach, you must disable the global switch and re-create receipt delivery yourself. That requires a webhook endpoint that verifies signatures, a mail provider with rate limits, code to handle idempotency and retries, and storage for sent receipts so you can audit or re-send. Our website's RouteReceipts removes that work by integrating at the dashboard level to decide which Stripe events should produce outbound receipts.
What an allowlist means for receipts 🧩
An allowlist marks specific customer records to receive receipts while suppressing emails for everyone else. Typical allowlist rules include customers tagged as enterprise, internal cost centers, or reseller accounts. For example, you might set customer.metadata.receipt_allowed = true for corporate clients and match by email domain for resellers.
Building that yourself forces you to maintain metadata sync logic, webhooks that inspect events, and a mailer pipeline to send receipts for allowed customers only. You must also handle credential rotation, token refresh, webhook retries with exponential backoff, and audit logs for compliance. RouteReceipts offers a dashboard-native allowlist and a decision audit log so teams can manage which customers receive receipts without custom webhooks or ongoing maintenance. See the RouteReceipts documentation for setup steps and examples of allowlist rules: docs
When selective routing matters for finance teams ⚖️
Selective routing reduces noise for retail buyers and ensures accounting teams receive the receipts they need for expense reporting. For example, a 3-person accounting team at a B2B provider can avoid manual collection by auto-sending receipts to customers whose records include billing_group:enterprise or invoice_email domain matches corp.com. A subscription business might only allow receipts for customers with tax-exempt status or reseller relationships.
To implement this without a tool, your team must maintain rule definitions, create and secure webhook endpoints, queue events to prevent race conditions on invoice updates, and instrument monitoring and alerting to catch missed receipts. RouteReceipts centralizes rule creation in the Stripe dashboard, applies rules to the right Stripe events, and stores an audit trail for finance to review. Review the pricing and plan details to match volume and audit needs: pricing
Why DIY routing becomes complex and error-prone
Building conditional receipt routing with webhooks and external automations looks simple at first. Each new condition or higher transaction volume quickly exposes hidden engineering work: credential rotation, retries, duplicate deliveries, and missing audit trails. This section lists the specific failure modes and ongoing maintenance you will face if you choose a DIY path instead of a dashboard-native no code stripe receipt routing solution.
DIY technical checklist and hidden costs ⚠️
A robust DIY router requires more than a webhook endpoint. You must manage credential storage and rotation for every integration, implement token refresh, and verify Stripe webhook signatures on every event. Add rate limit handling and exponential backoff for retries to avoid lost events when Stripe throttles you. Idempotency keys and concurrency controls prevent sending duplicate receipts when retries and concurrent processes race. Cache user allowlist flags locally to avoid extra reads, then build cache invalidation when customer metadata changes. Finally, log events in a tamper-evident way and maintain monitoring and alerts to meet audit and dispute needs.
⚠️ Warning: Do not log customer payment card data or other sensitive personal data in plain text. Configure logs to redact PII and retain only the Stripe object IDs needed for reconciliation.
Each item above adds development time and a new operational failure mode that scales with transaction volume. Route Receipts removes this checklist by embedding allowlist controls in the Stripe dashboard and handling auth, retries, and logging for you. See our Route Receipts docs for setup details.
Common no-code workarounds and their limits 🔁
Tools like Zapier and Make can observe Stripe events and perform conditional routing, but they introduce practical limits. Automations often rely on polling or third-party webhooks that produce duplicate triggers when the app retries after timeouts. Handling late-arriving events, such as dispute updates or delayed refunds, requires extra logic to reconcile state across systems. Many automation platforms store OAuth tokens in their workspace, which still requires rotation and team access controls to remain secure. Most importantly, these tools rarely attach a centralized audit trail back to the Stripe object, which complicates compliance and dispute resolution.
Example: a Zap that sends receipts for flagged customers must implement dedupe using the Stripe charge ID, persist a processed-event table, and reconcile missed events on a schedule. That adds bookkeeping and nightly jobs you must maintain. Route Receipts avoids these limits by mapping rules to Stripe objects and keeping decisions auditable within the Stripe dashboard.
How Route Receipts reduces that operational burden ✅
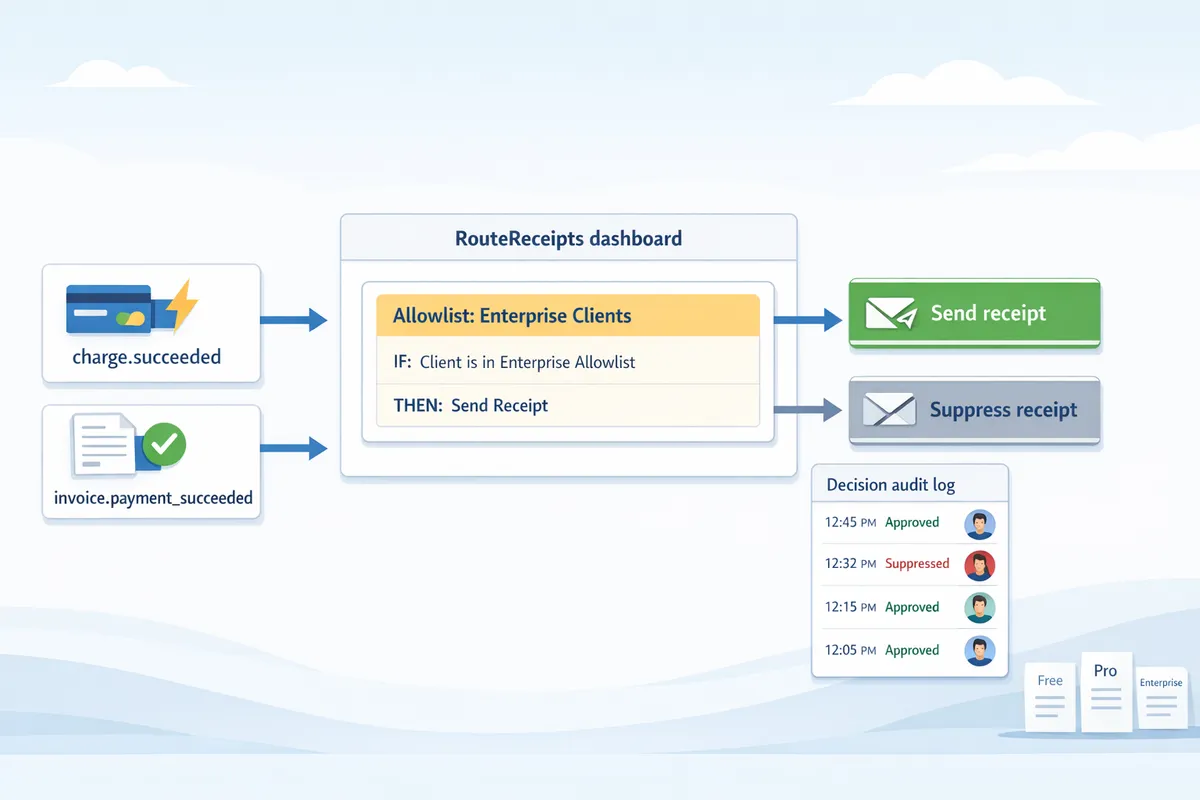
Route Receipts embeds conditional routing into your Stripe workflow so you do not operate separate webhook infrastructure. Add or remove customers from an allowlist directly in Stripe and the app enforces that rule when receipt events occur. The app handles retries with backoff, respects rate limits, and records a decision audit log tied to the Stripe charge or invoice ID so finance and support teams can trace every delivery.
Practical scenario: for enterprise customers who require receipts, you add them to the allowlist in the Route Receipts dashboard. Without Route Receipts you would need to build a webhook receiver, manage token rotation, implement idempotency, write retry logic, maintain a processed-event store, and create an audit report for disputes. With Route Receipts those operational tasks are handled for you, freeing engineering time and reducing incident windows. Learn more in our dashboard setup guide and see pricing tiers for volume needs on the Route Receipts pricing page.
Step-by-step no-code setup and runbooks (Getting started)
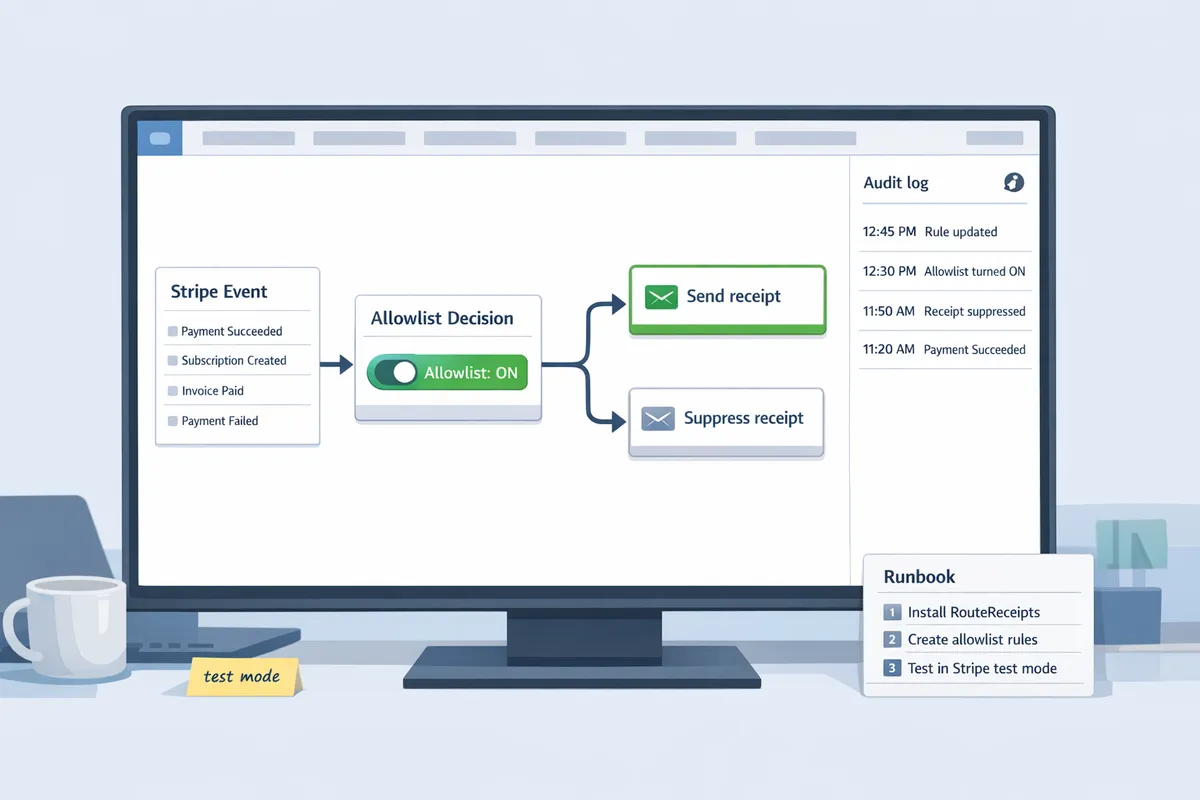
Follow these ordered steps to install Route Receipts, create allowlist rules for common billing scenarios, and validate results in Stripe test mode. This runbook gives non-technical admins a repeatable path for no code stripe receipt routing using Route Receipts' dashboard-native controls.
Install Route Receipts and grant permissions 🔧
- Open the Route Receipts listing and install the app into your Stripe account. Use your normal Stripe admin flow and accept the app's requested permissions. See the Route Receipts docs for screenshots and troubleshooting: docs.
- Grant only the minimal permissions Route Receipts requests. At minimum, allow: read invoices, read customers, update customer metadata, and read payment events. Missing any of these blocks the allowlist rules from evaluating correctly.
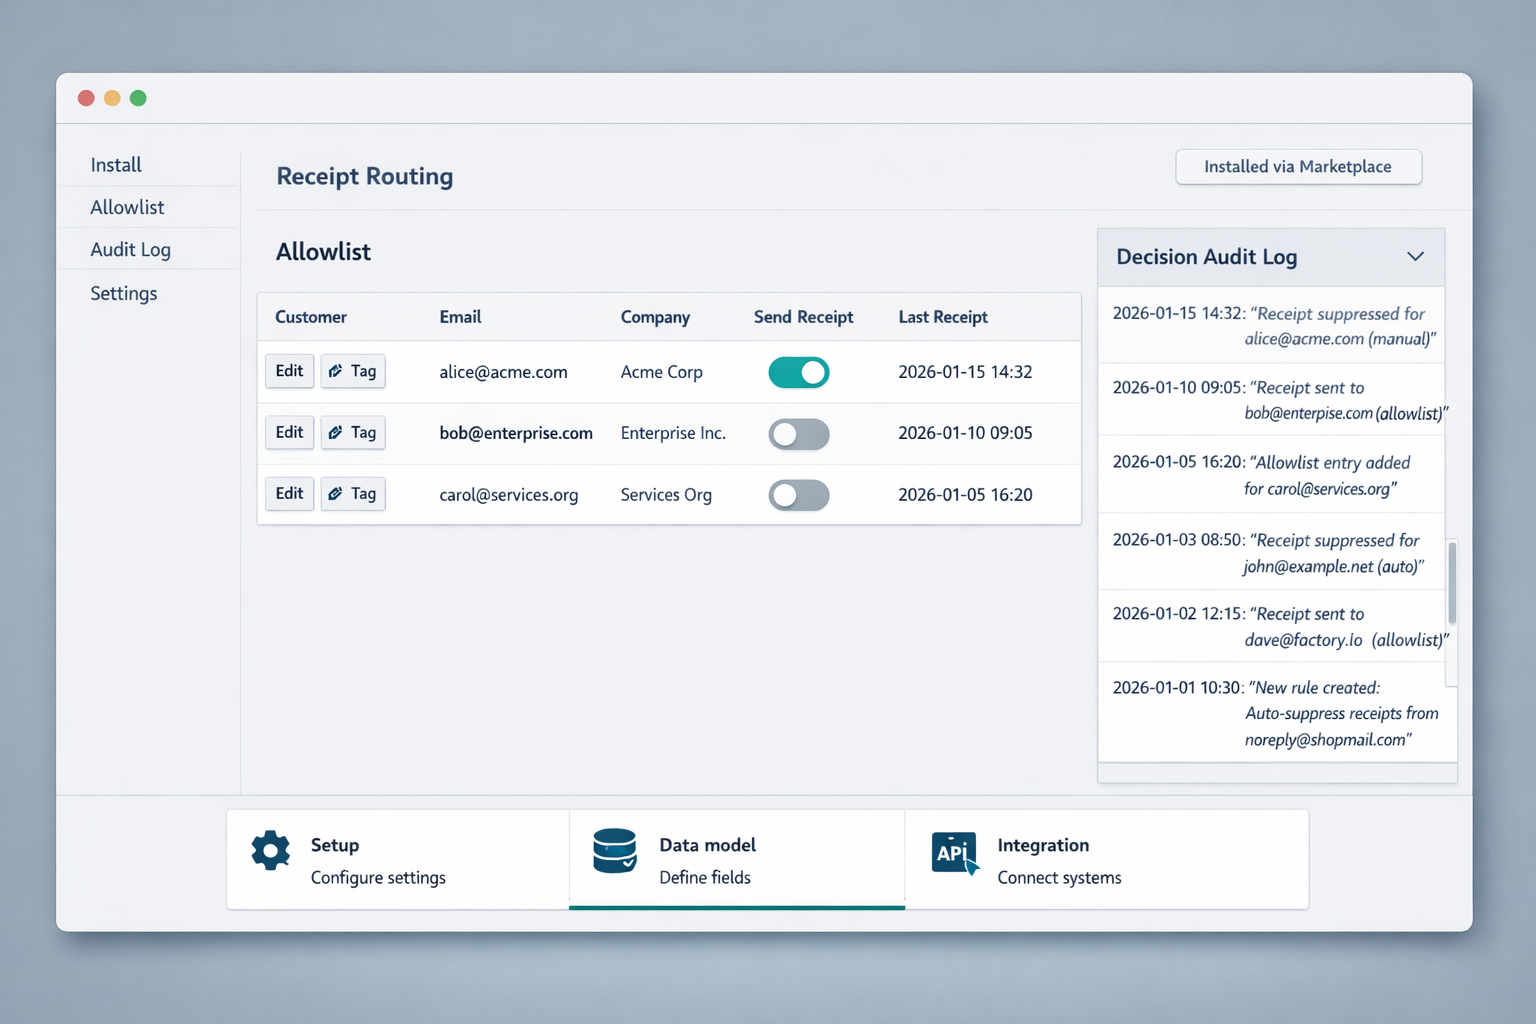
- Confirm installation by opening the Route Receipts dashboard inside Stripe. Verify you can view the decision audit log and rule editor.
Checklist to run before creating rules:
- Confirm Stripe account role has app installation rights.
- Verify the app shows granted scopes in Stripe's Integrations panel.
- Ensure test mode is enabled for your first run.
Why use Route Receipts instead of building a webhook service yourself. A DIY path requires you to manage credential rotation, token refresh, quota monitoring, exponential backoff for retries, idempotency to avoid duplicate deliveries, and monitoring for failed runs. That operational surface multiplies as rules and volume grow.
If you still want a minimal webhook example to see the pieces involved, here is a short illustrative handler (not production-ready):
// verify header, fetch event, match rule
if (!verifySig(req)) throw 401;
const ev = parseEvent(req.body);
try { processEvent(ev); } catch (err) {
 retryWithBackoff(ev);
 alertOnFailure(ev, err);
}
Each line above hides several tasks: signature verification, durable storage of retries, alerting, and idempotency checks. Route Receipts removes that burden and exposes the UI to manage those behaviors.
Create allowlist rules for common scenarios 📝
An allowlist is a defined set of customers who should receive receipts; Route Receipts maps customer attributes or metadata to delivery decisions so you can allowlist stripe receipts without webhooks.
Use these three starters in the Route Receipts rule editor:
- Subscriptions (expense reports). Condition: customer.metadata.expense_reports == "true". Action: send invoice and payment receipts. Use this when enterprise clients track expenses centrally. Example: tag enterprise accounts in your CRM, sync to metadata, then apply the rule.
- One-time payments (threshold). Condition: invoice.amount_paid >= RULE_THRESHOLD. Action: send receipt only when amount exceeds your threshold. Example: set RULE_THRESHOLD to $500 and target customers who need receipts for large purchases.
- Refunds (audit-required). Condition: refund.reason == "customer_request" OR customer.metadata.requires_refund_receipt == "true". Action: send refund receipt. Use this for cases where finance teams require a formal refund notice.
Each template maps an event type (invoice.payment_succeeded, charge.succeeded, refund.created) to a metadata or tag condition and a send/skip decision. You can import tags from your CRM or set metadata via the Stripe UI.
💡 Tip: Start with a small allowlist sample and expand after verifying results. Test with 5–10 accounts before rolling out to production to limit accidental mass emails.
Building these rules yourself means writing event parsers, condition evaluators, and a UI for non-developers, plus handling race conditions when a refund and charge occur near-simultaneously. Route Receipts gives the UI, decision logic, and audit trail so admins avoid that engineering debt.
Test rules and verify delivery with the decision log 🧭
- Switch to Stripe test mode and create a test customer that mirrors your real metadata or tag structure.
- Trigger the event type you want to test: create a subscription invoice, process a one-time charge above/below the threshold, or issue a refund in test mode.
- Open the Route Receipts decision audit log and confirm a decision entry appears for each test event. The log shows: matched rule, evaluated conditions, action taken, and delivery status.
- Verify actual delivery behavior. For email receipts, confirm the test inbox received or did not receive the message according to the rule. For blocked deliveries, verify the message is absent and the audit log shows the skip reason.
- Simulate a failed delivery (for example, an invalid recipient address) to confirm Route Receipts triggers alerts and records retry attempts. If a rule misfires, use the audit log entry to edit the rule and re-run the test event.
Short test checklist:
- Create test customer with metadata key used by your rule.
- Trigger event in Stripe (UI or API).
- Confirm Route Receipts audit entry and action.
- Check email inbox or delivery failure alert.
If you need help during testing, consult our support center or step-by-step guides at support and docs. For pricing and plan limits before scaling tests, see pricing.
Next steps and advanced resources
These next steps cover the practical workflows, governance, and monitoring you need to scale selective receipt routing beyond a single pilot. Each subsection points to concrete templates, security controls, and a phased migration checklist you can apply with RouteReceipts and complementary automation tools.
Integration templates for Zapier and Make 🔗
Use Zapier or Make only for edge cases where a dashboard-native solution cannot meet a specific downstream need. Example Zapier flow: 1) Trigger: Stripe "invoice.payment_succeeded" webhook. 2) Filter: check customer.metadata.allow_receipt equals "true". 3) Action: HTTP request to the RouteReceipts admin API to mark that invoice as allowed for email. 4) Follow-up: call Stripe’s email.send endpoint if RouteReceipts has confirmed routing.
A Make scenario follows the same pattern but groups retries and rate limits into a single scenario with built-in throttling and error paths. Both approaches require extra operational work: credential rotation, token refresh, quota monitoring, idempotency keys, exponential backoff for retries, and audit logging to avoid duplicate sends. RouteReceipts removes these burdens by offering a dashboard-native allowlist and decision audit log, so teams can prefer the no code stripe receipt routing path where possible. See our RouteReceipts docs for API details and examples.
Security, privacy, and auditability considerations 🔒
Restrict who can change allowlist status and record every routing decision for audit purposes. Use role-based access so only finance or designated admins update allowlist entries. Keep routing logs within RouteReceipts or Stripe rather than exporting full payment payloads to third-party tools.
Store only the minimum metadata in external automations and never persist raw card details. Keep retention policies aligned with your compliance needs and document who may view routing logs for audits. Use Stripe’s event replay and RouteReceipts decision log to reproduce behavior without exposing payment data. For questions about data handling, consult our privacy policy and security guidance in the RouteReceipts docs.
⚠️ Warning: Do not log full card numbers or CVV in external systems.
Migration checklist: move from global receipts to selective routing 🛠️
- Inventory segments. Export customer groups by billing model, enterprise status, and accounting needs. 2. Select initial allowlist members. Start with expense-reporting teams and enterprise customers who explicitly request receipts. 3. Parallel test in staging. Run identical test-mode traffic in a Stripe test account and validate routing using RouteReceipts’ decision audit log. 4. Phased rollout. Release to a single product line, monitor delivery failures, then expand. 5. Update support scripts. Add a short troubleshooting playbook for support agents to check allowlist status and resend receipts.
Include rollback steps: switch back to global receipts, remove recent allowlist changes, and notify affected customers. Monitor these KPIs during rollout: routing errors, delivery failures, and customer support volume. If you need help with rollout planning or monitoring hooks, our support team documents common templates and alerting patterns in the RouteReceipts docs and support center.
For additional reading and troubleshooting, visit our RouteReceipts docs, the pricing page for plan limits, and the support portal for migration templates and live help.
Frequently Asked Questions
Selective receipt routing raises predictable operational and compliance questions. The answers below focus on practical setup, auditability, and when to combine Route Receipts with external automation tools so you avoid building fragile webhook infrastructure.
How does Route Receipts integrate with Stripe without writing webhooks? 🔌
Route Receipts installs from the Stripe Marketplace and runs decision logic inside your Stripe dashboard, so you do not need to build or maintain separate webhook endpoints. Our app requests limited Stripe permissions at install time and evaluates routing rules in the dashboard context, which removes the need to manage credential rotation, token refresh, and external endpoint uptime. For a step-by-step install and the exact permissions requested, see the installation guide in our docs.
Can I allowlist stripe receipts without webhooks? ✅
Yes. Route Receipts implements allowlist controls inside the Stripe dashboard so you can mark specific customers or subscriptions to receive receipts without creating webhook infrastructure. You can set allowlist flags on customer records, subscription metadata, or invoice objects and combine those flags with rule conditions (for example, enterprise customers or invoices above a threshold). See our docs for the allowlist setup and examples of common billing scenarios.
Is any coding required to set up selective receipt routing? 🛠️
No, basic selective receipt routing with Route Receipts requires no code. Our dashboard exposes rule templates and an allowlist UI that handles common cases like one-time payments, subscription invoices, and refunds. Advanced teams can still extend workflows with automation tools, but Route Receipts removes the need to build retry logic, backoff strategies, quota monitoring, and webhook error handling for routing decisions. Check pricing if you plan to scale beyond the free tier.
How are refunds and subscription invoices handled? 🔄
Route Receipts lets you target receipts by event type so you can treat refunds, one-time invoices, and subscription invoices differently. Create a rule, select the Stripe event types to target (for example, refund.created or invoice.finalized), and choose whether the rule allowlists or suppresses delivery. Example flow: 1) Create a "Refund receipts" rule that targets refund events and allowlists enterprise customers, 2) Create a separate rule that suppresses routine subscription receipts, 3) Test both rules in Stripe test mode and inspect audit entries. See our docs for templates and recommended rule order.
How can I audit who received a receipt and why? 📜
Route Receipts writes a decision audit log attached to the Stripe object showing the rule that triggered, the timestamp, and the delivery outcome. You can view the audit entries directly in our dashboard or filter them by customer, object ID, or rule name for finance and compliance reviews. If you need exportable records or custom retention policies, contact our support for guidance on integrating audit exports into your governance processes.
💡 Tip: Test rules in Stripe test mode and verify audit entries for a representative sample of events before switching to live mode.
When should I still use Zapier or Make alongside Route Receipts? 🔍
Use Zapier or Make when you need cross-system automations that Route Receipts does not perform, such as pushing receipt metadata to a CRM or posting a notification to Slack. Keep delivery decisions inside Route Receipts so you preserve a single audit trail and avoid duplicating decision logic across systems. If you try to replace routing with custom webhook flows, you must build and maintain credential rotation, token refresh, retry with backoff, duplicate detection, race condition handling on concurrent writes, cache invalidation, and monitoring—operational work that Route Receipts removes. For examples of common cross-system flows and templates, see our blog and contact support for integration advice.
Next steps for selective receipt routing
You now know how a dashboard-native approach removes the need for custom code to control who receives receipts. The no-code way to route customer receipts in stripe lets you set simple rules and an allowlist so only customers who need receipts get them, reducing inbox clutter and manual work.
RouteReceipts is a specialized application designed to enhance the way businesses manage their Stripe receipt distribution. By integrating into the Stripe dashboard, RouteReceipts makes it easy to manage an allowlist without custom webhooks or credential juggling. The app includes a decision audit log and a straightforward setup via the Stripe Marketplace; it also offers a free plan that includes 20 receipts per month with upgrade options for higher volume.
Create your first allowlist with Route Receipts using the getting-started guide in our docs. Learn more about No-Code Receipt Management on our blog, and subscribe to our newsletter for implementation tips and updates.